, ,

checkmac.php

cat /temp/checkmac.php
<?php
// PHP page to check if MAC is not aleady there for the user, then INSERT it for MAC VALIDATION,
// it will add mac for 1st time login user only
// 31-OCT-2017

$link = mysql_connect('localhost', 'root', 'roott123');
if (!$link) {
die('Could not connect: ' . mysql_error());
}
// Default DB is radius
mysql_select_db('radius');
// Look for MAC entry for this user
$result=mysql_query("select * FROM radcheck WHERE `UserName`='$argv[1]' AND attribute='Calling-Station-Id' order by Username limit 1");
$val = mysql_num_rows($result);
if ($val > 0) {
printf ("MAC Entry already found by Suntech");
}
else {
printf ("Seems to be New User, adding its MAC address in table ...");
mysql_query("INSERT into radcheck (UserName, Attribute, op, Value) values ('$argv[1]', 'Calling-Station-Id', ':=', '$argv[2]')");
}
?>



 cat /temp/checkmac.php7
<?php
// PHP page to check if MAC is not aleady there for the user, then INSERT it for MAC VALIDATION,
// it will add mac for 1st time login user only
// 31-OCT-2017

$link = mysqli_connect('localhost', 'root', 'roott123', 'radius');
if (!$link) {
die('Could not connect: ' . mysql_error());
}
// Default DB is radius
// mysqli_select_db('radius');
// Look for MAC entry for this user
$result=mysqli_query($link, "select * FROM radcheck WHERE `UserName`='$argv[1]' AND attribute='Calling-Station-Id' order by Username limit 1");
$val = mysqli_num_rows($result);
if ($val > 0) {
printf ("MAC Entry already found by ZAiBBBBBBBBBBBBBBBB");
}
else {
printf ("Seems to be New User, adding its MAC address in table ...");
mysqli_query($link, "INSERT into radcheck (UserName, Attribute, op, Value) values ('$argv[1]', 'Calling-Station-Id', ':=', '$argv[2]')");
}
?>
Continue reading checkmac.php
,

How to change date format in PHP?

 To convert the date-time format PHP provides strtotime() and date() function. We change the date format from one format to another. For example - we have stored date in MM-DD-YYYY format in a variable, and we want to change it to DD-MM-YYYY format.

We can achieve this conversion by using strtotime() and date() function. These are the built-in functions of PHP. The strtotime() first converts the date into the seconds, and then date() function is used to reconstruct the date in any format. Below some examples are given to convert the date format.

Change YYYY-MM-DD to DD-MM-YYYY

In the below example, we have date 2019-09-15 in YYYY-MM-DD format, and we will convert this to 15-09-2019 in DD-MM-YYYY format.

  1. <?php  
  2.     $orgDate = "2019-09-15";  
  3.     $newDate = date("d-m-Y", strtotime($orgDate));  
  4.     echo "New date format is: ".$newDate. " (MM-DD-YYYY)";  
  5. ?>  

Output

New date format is: 15-09-2019 (DD-MM-YYYY)

Change YYYY-MM-DD to MM-DD-YYYY

In the below example, we have date 2019-02-26 in YYYY-MM-DD format, and we will convert this to 02-26-2019 (MM-DD-YYYY) format.

  1. <?php  
  2.     $orgDate = "2019-02-26";  
  3.     $newDate = date("m-d-Y", strtotime($orgDate));  
  4.     echo "New date format is: ".$newDate. " (MM-DD-YYYY)";  
  5. ?>  

Output

New date format is: 02-26-2019 (MM-DD-YYYY)

Change DD-MM-YYYY to YYYY-MM-DD

In the below example, we have date 17-07-2012 in DD-MM-YYYY format, and we will convert this to 2012-07-17 (YYYY-MM-DD) format.

  1. <?php  
  2.     $orgDate = "17-07-2012";  
  3.     $newDate = date("Y-m-d", strtotime($orgDate));  
  4.     echo "New date format is: ".$newDate. " (YYYY-MM-DD)";  
  5. ?>  

Output

New date format is: 2012-07-17 (YYYY-MM-DD)

Change DD-MM-YYYY to YYYY/MM/DD

Suppose we have date 17-07-2012 in DD-MM-YYYY format separated by dash (-) sign. We want to convert this to 2012/07/17 (YYYY/MM/DD) format, which will be separated by the slash (/). In the below example, DD-MM-YYYY format is converted to the YYYY-MM-DD format, and also dashes (-) will be replaced with slash (/) sign.

  1. <?php  
  2.     $orgDate = "17-07-2012";  
  3.     $date = str_replace('-"', '/', $orgDate);  
  4.     $newDate = date("Y/m/d", strtotime($date));  
  5.     echo "New date format is: ".$newDate. " (YYYY/MM/DD)";  
  6. ?>  

Output

 date format is: 2012/07/17 (YYYY/MM/DD)

Change date time to another format

Here in the below example, we will convert the date format MM-DD-YYYY to YYYY-DD-MM format and 12 hours time clock to 24 hours time clock.

  1. <?php  
  2.     $date = "06/13/2019 5:35 PM";  
  3.     //converts date and time to seconds  
  4.     $sec = strtotime($date);  
  5.     //converts seconds into a specific format  
  6.     $newdate = date ("Y/d/m H:i", $sec);  
  7.     //Appends seconds with the time  
  8.     $newdate = $newdate . ":00";  
  9.     // display converted date and time  
  10.     echo "New date time format is: ".$newDate;  
  11. ?>  

Output

New date time format is: 2019/13/06 17:35:00
Continue reading How to change date format in PHP?

mysql error 1067 invalid default value for timestamp


  1. Start Cmd.
  2. Type mysql -u root -p Then Press Enter.
  3. And Select Your Database (Ex "USE DATABASE <DATABASE NAME>").
  4. Tpe this SET @@session.sql_mode ="ONLY_FULL_GROUP_BY,STRICT_TRANS_TABLES,NO_ZERO_IN_DATE,ERROR_FOR_DIVISION_BY_ZERO,NO_AUTO_CREATE_USER,NO_ENGINE_SUBSTITUTION";
  5. And Then Press Enter.
Continue reading mysql error 1067 invalid default value for timestamp
,

Access Denied for User 'root'@'localhost' (using password: YES) - No Privileges?

If you have that same problem in MySql 5.7.+ :

 Access denied for user 'root'@'localhost'

it's because MySql 5.7 by default allow to connect with socket, which means you just connect with sudo mysql. If you run sql :
SELECT user,authentication_string,plugin,host FROM mysql.user;
then you will see it :
+------------------+-------------------------------------------+-----------------------+-----------+
| user             | authentication_string                     | plugin                | host      |
+------------------+-------------------------------------------+-----------------------+-----------+
| root             |                                           | auth_socket           | localhost |
| mysql.session    | *THISISNOTAVALIDPASSWORDTHATCANBEUSEDHERE | mysql_native_password | localhost |
| mysql.sys        | *THISISNOTAVALIDPASSWORDTHATCANBEUSEDHERE | mysql_native_password | localhost |
| debian-sys-maint | *497C3D7B50479A812B89CD12EC3EDA6C0CB686F0 | mysql_native_password | localhost |
+------------------+-------------------------------------------+-----------------------+-----------+
4 rows in set (0.00 sec)
To allow connection with root and password, then update the values in the table with command :
ALTER USER 'root'@'localhost' IDENTIFIED WITH mysql_native_password BY 'Current-Root-Password';
FLUSH PRIVILEGES;
Then run the select command again and you'll see it has changed :
+------------------+-------------------------------------------+-----------------------+-----------+
| user             | authentication_string                     | plugin                | host      |
+------------------+-------------------------------------------+-----------------------+-----------+
| root             | *2F2377C1BC54BE827DC8A4EE051CBD57490FB8C6 | mysql_native_password | localhost |
| mysql.session    | *THISISNOTAVALIDPASSWORDTHATCANBEUSEDHERE | mysql_native_password | localhost |
| mysql.sys        | *THISISNOTAVALIDPASSWORDTHATCANBEUSEDHERE | mysql_native_password | localhost |
| debian-sys-maint | *497C3D7B50479A812B89CD12EC3EDA6C0CB686F0 | mysql_native_password | localhost |
+------------------+-------------------------------------------+-----------------------+-----------+
4 rows in set (0.00 sec)
And that's it. You can run this process after running and completing the sudo mysql_secure_installation command.
Continue reading Access Denied for User 'root'@'localhost' (using password: YES) - No Privileges?

MySQL backup script


#! /bin/bash
### MySQL Server Login Info ###
MUSER="root"
MPASS="roott123"
MHOST="localhost"
MPORT="3306"
DBNAME="radius"
MYSQL="$(which mysql)"
MYSQLDUMP="$(which mysqldump)"


### File Info ###
# Save backup in temp directory before upload to server
TEMPDIR="/root/backup_radius" #Exp: ./bkp_temp

# Name of bkp file (before the date)
FILENAME="Radius_Backup_" #Exp: my_prj_daily_bkp_
NOW=$(date +%F)


#Create and clean temp directory
[ ! -d "$TEMPDIR" ] && mkdir -p "$TEMPDIR"
rm -f "$TEMPDIR"/*.*

# Create bkp
TFILENAME="$FILENAME""$NOW".sql
FILE=$TEMPDIR/$TFILENAME
$MYSQLDUMP -u $MUSER -h $MHOST -P $MPORT  -p$MPASS $DBNAME > $FILE
~
Continue reading MySQL backup script
, , , ,

How to Install PHP 7 in CentOS 6

The CentOS 6 official software repositories has PHP 5.3 which has reached end of life and no longer actively maintained by the developers.
To keep up with the latest features and security updates, you need a newer (probably the latest) version of PHP on your CentOS 6 system.

For the purpose of this guide, we will be operating the system as root, if that is not the case for you, make use of the sudo command to acquire root privileges.

Installing PHP 7 on CentOS 7

1. To install latest PHP 7, you need to add EPEL and Remi repository to your CentOS 6 system like so.
# yum install https://dl.fedoraproject.org/pub/epel/epel-release-latest-6.noarch.rpm
# yum install http://rpms.remirepo.net/enterprise/remi-release-6.rpm
2. Now install yum-utils, a group of useful tools that enhance yum’s default package management features.
Yum-utils can be used for manipulating package repositories and additional package management operations such as enabling or disabling packages without any manual configuration by a system administrator.
You can install it as follows:
# yum install yum-utils
3. In this step, you need to enable Remi repository using yum-config-manager utility, as the default repository for installing PHP.
# yum-config-manager --enable remi-php70   [Install PHP 7.0]
If you want to install PHP 7.1 or PHP 7.2 on CentOS 6, just enable it as shown.
# yum-config-manager --enable remi-php71   [Install PHP 7.1]
# yum-config-manager --enable remi-php72   [Install PHP 7.2]
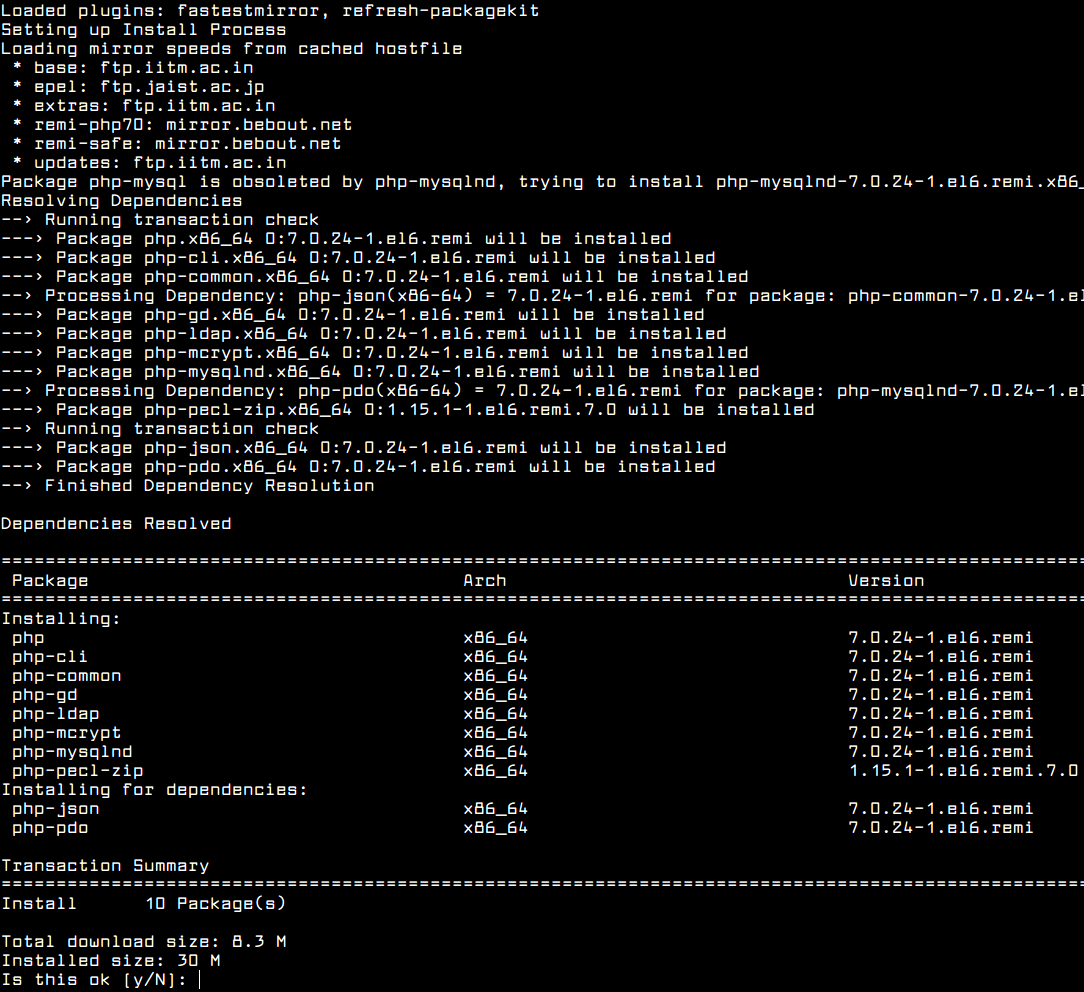
4. Then finally install PHP 7 on CentOS 6 with all necessary PHP modules using the following command.
# yum install php php-mcrypt php-cli php-gd php-curl php-mysql php-ldap php-zip php-fileinfo 
Install PHP 7 on CentOS 6
If you are curious, double check the installed version of PHP on your system as follows.
# php -V 
Check PHP Version in CentOS 6
You might also want to check out these useful PHP articles:
Continue reading How to Install PHP 7 in CentOS 6

Updated and tested (as of this post date) version of /etc/yum.repos.d/CentOS-Base.repo for Centos 5.11 (final):

# CentOS-Base.repo
#
# The mirror system uses the connecting IP address of the client and the
# update status of each mirror to pick mirrors that are updated to and
# geographically close to the client.  You should use this for CentOS updates
# unless you are manually picking other mirrors.
#
# If the mirrorlist= does not work for you, as a fall back you can try the 
# remarked out baseurl= line instead.
#
#

[base]
name=CentOS-$releasever - Base
#mirrorlist=http://mirrorlist.centos.org/?release=$releasever&arch=$basearch&repo=os
#baseurl=http://mirror.centos.org/centos/$releasever/os/$basearch/
baseurl=http://vault.centos.org/5.11/os/$basearch
gpgcheck=1
gpgkey=file:///etc/pki/rpm-gpg/RPM-GPG-KEY-CentOS-5

#released updates 
[updates]
name=CentOS-$releasever - Updates
#mirrorlist=http://mirrorlist.centos.org/?release=$releasever&arch=$basearch&repo=updates
#baseurl=http://mirror.centos.org/centos/$releasever/updates/$basearch/
baseurl=http://vault.centos.org/5.11/updates/$basearch/
gpgcheck=1
gpgkey=file:///etc/pki/rpm-gpg/RPM-GPG-KEY-CentOS-5

#additional packages that may be useful
[extras]
name=CentOS-$releasever - Extras
#mirrorlist=http://mirrorlist.centos.org/?release=$releasever&arch=$basearch&repo=extras
#baseurl=http://mirror.centos.org/centos/$releasever/extras/$basearch/
baseurl=http://vault.centos.org/5.11/extras/$basearch/
gpgcheck=1
gpgkey=file:///etc/pki/rpm-gpg/RPM-GPG-KEY-CentOS-5

#additional packages that extend functionality of existing packages
[centosplus]
name=CentOS-$releasever - Plus
#mirrorlist=http://mirrorlist.centos.org/?release=$releasever&arch=$basearch&repo=centosplus
#baseurl=http://mirror.centos.org/centos/$releasever/centosplus/$basearch/
baseurl=http://vault.centos.org/5.11/centosplus/$basearch/
gpgcheck=1
enabled=0
gpgkey=file:///etc/pki/rpm-gpg/RPM-GPG-KEY-CentOS-5

#contrib - packages by Centos Users
[contrib]
name=CentOS-$releasever - Contrib
#mirrorlist=http://mirrorlist.centos.org/?release=$releasever&arch=$basearch&repo=contrib
#baseurl=http://mirror.centos.org/centos/$releasever/contrib/$basearch/
baseurl=http://vault.centos.org/5.11/contrib/$basearch/
gpgcheck=1
enabled=0
gpgkey=file:///etc/pki/rpm-gpg/RPM-GPG-KEY-CentOS-5
Continue reading Updated and tested (as of this post date) version of /etc/yum.repos.d/CentOS-Base.repo for Centos 5.11 (final):
, ,

Create a (local) repository and use yum to have it resolve the dependencies for you

Summarized and further minimized (not ideal, but quickest):
  1. Create a directory for you local repository, e.g. /home/user/repo.
  2. Move the RPMs into that directory.
  3. Fix some ownership and filesystem permissions:
    # chown -R root.root /home/user/repo
    
  4. Install the createrepo package if not installed yet, and run
    # createrepo /home/user/repo
    # chmod -R o-w+r /home/user/repo
    
  5. Create a repository configuration file, e.g. /etc/yum.repos.d/myrepo.repo containing
    [local]
    name=My Awesome Repo
    baseurl=file:///home/user/repo
    enabled=1
    gpgcheck=0
    
  6. Install your package using
    # yum install packagename
    
Continue reading Create a (local) repository and use yum to have it resolve the dependencies for you
, ,

How to sort rows of HTML table that are called from MySQL

That's actually pretty easy, here's a possible approach:


<table>
    <tr>
        <th>
            <a href="?orderBy=type">Type:</a>
        </th>
        <th>
            <a href="?orderBy=description">Description:</a>
        </th>
        <th>
            <a href="?orderBy=recorded_date">Recorded Date:</a>
        </th>
        <th>
            <a href="?orderBy=added_date">Added Date:</a>
        </th>
    </tr>
</table>
<?php
$orderBy = array('type', 'description', 'recorded_date', 'added_date');

$order = 'type';
if (isset($_GET['orderBy']) && in_array($_GET['orderBy'], $orderBy)) {
    $order = $_GET['orderBy'];
}

$query = 'SELECT * FROM aTable ORDER BY '.$order;

// retrieve and show the data :)
?>
Continue reading How to sort rows of HTML table that are called from MySQL

Asterisk g.729 and g.723 Codec Transcoding/Pass-Thru

Given below are the step by step instruction for making Asterisk work as a codec Transcoder

Step 1:
Download suitable codec binaries for your asterisk platform

Step 2:
Restart asterisk to make asterisk load newly installed codec modules
 e.g. amportal restart

Step 3:
log into asterisk console asterisk -rvvvv and type this command core show codec and check if you can see newly install codecs

elastix*CLI> core show codecs
Disclaimer: this command is for informational purposes only.
It does not indicate anything about your configuration.

INT    BINARY        HEX   TYPE       NAME   DESC
——————————————————————————–
1 (1 <<  0)      (0x1)  audio       g723   (G.723.1)
2 (1 <<  1)      (0x2)  audio        gsm   (GSM)
4 (1 <<  2)      (0x4)  audio       ulaw   (G.711 u-law)
8 (1 <<  3)      (0x8)  audio       alaw   (G.711 A-law)
16 (1 <<  4)     (0x10)  audio   g726aal2   (G.726 AAL2)
32 (1 <<  5)     (0x20)  audio      adpcm   (ADPCM)
64 (1 <<  6)     (0x40)  audio       slin   (16 bit Signed Linear PCM)
128 (1 <<  7)     (0x80)  audio      lpc10   (LPC10)
256 (1 <<  8)    (0x100)  audio       g729   (G.729A)
512 (1 <<  9)    (0x200)  audio      speex   (SpeeX)
1024 (1 << 10)    (0x400)  audio       ilbc   (iLBC)
2048 (1 << 11)    (0x800)  audio       g726   (G.726 RFC3551)
4096 (1 << 12)   (0x1000)  audio       g722   (G722)
65536 (1 << 16)  (0x10000)  image       jpeg   (JPEG image)
131072 (1 << 17)  (0x20000)  image        png   (PNG image)
262144 (1 << 18)  (0x40000)  video       h261   (H.261 Video)
524288 (1 << 19)  (0x80000)  video       h263   (H.263 Video)
1048576 (1 << 20) (0x100000)  video      h263p   (H.263+ Video)
2097152 (1 << 21) (0x200000)  video       h264   (H.264 Video)

Step 4:
Choose your fav. editor in linux , mine is Vi
vi /etc/asterisk/extensions.conf and add these lines under the [General]
[general]
#include sip_general_additional.conf
bindport =5060         ; Port to bind to (SIP is 5060)
bindaddr = 0.0.0.0    ; Address to bind to (all addresses on machine)
disallow=all
allow=g723
allow=g729

And for your GW settings do the same
[EXGN]
type=peer
host=x.x.x.x
port=5060
disallow=all
allow=g729
;dtmfmode=inband
;dtmf=inband
nat=no
;insecure=very

Now set your Eyebeam to send calls using g.729 codec to asterisk it should work
To check if calls are going into g.729/723 codec run this command on the main console
sip show channels

I hope this should work
Continue reading Asterisk g.729 and g.723 Codec Transcoding/Pass-Thru