What is APF (Advanced Policy Firewall)?

APF Firewall
APF is a policy based iptables firewall system designed for ease of use and configuration. It employs a subset of features to satisfy the veteran Linux user and the novice alike. Packaged in tar.gz format and RPM formats, make APF ideal for deployment in many server environments based on Linux. APF is developed and maintained by R-fx Networks: http://www.rfxnetworks.com/apf.php

This guide will show you how to install and configure APF firewall, one of the better known Linux firewalls available.10

Limit SSH connections to one IP with APF in this advanced tutorial

Requirements:

- Root SSH access to your server

Lets begin!
Login to your server through SSH and su to the root user.


1. cd /root/downloads or another temporary folder where you store your files.

2. wget http://www.rfxnetworks.com/downloads/apf-current.tar.gz

3. tar -xvzf apf-current.tar.gz

4. cd apf-0.9.5-1/ or whatever the latest version is.

5. Run the install file: ./install.sh


You will receive a message saying it has been installed

Installing APF 0.9.5-1: Completed.

Installation Details:
Install path: /etc/apf/
Config path: /etc/apf/conf.apf
Executable path: /usr/local/sbin/apf
AntiDos install path: /etc/apf/ad/
AntiDos config path: /etc/apf/ad/conf.antidos
DShield Client Parser: /etc/apf/extras/dshield/

Other Details:

Listening TCP ports: 1,21,22,25,53,80,110,111,143,443,465,993,995,2082,2083,2086,2087,2095,2096,3306

Listening UDP ports: 53,55880

Note: These ports are not auto-configured; they are simply presented for information purposes. You must manually configure all port options.

6. Lets configure the firewall: pico /etc/apf/conf.apf
We will go over the general configuration to get your firewall running. This isn't a complete detailed guide of every feature the firewall has. Look through the README and the configuration for an explanation of each feature.

We like to use DShield.org's "block" list of top networks that have exhibited
suspicious activity.
FIND: USE_DS="0"
CHANGE TO: USE_DS="1"

7. Configuring Firewall Ports:

Cpanel Servers
We like to use the following on our Cpanel Servers

Common ingress (inbound) ports
# Common ingress (inbound) TCP ports -3000_3500 = passive port range for Pure FTPD
IG_TCP_CPORTS="21,22,25,53,80,110,143,443,2082,2083, 2086,2087, 2095, 2096,3000_3500"
#
# Common ingress (inbound) UDP ports
IG_UDP_CPORTS="53"


Common egress (outbound) ports
# Egress filtering [0 = Disabled / 1 = Enabled]
EGF="1"

# Common egress (outbound) TCP ports
EG_TCP_CPORTS="21,25,80,443,43,2089"
#
# Common egress (outbound) UDP ports
EG_UDP_CPORTS="20,21,53"


Ensim Servers
We have found the following can be used on Ensim Servers - although we have not tried these ourselves as I don't run Ensim boxes.

Common ingress (inbound) ports
# Common ingress (inbound) TCP ports
IG_TCP_CPORTS="21,22,25,53,80,110,143,443,19638"
#
# Common ingress (inbound) UDP ports
IG_UDP_CPORTS="53"


Common egress (outbound) ports
# Egress filtering [0 = Disabled / 1 = Enabled]
EGF="1"

# Common egress (outbound) TCP ports
EG_TCP_CPORTS="21,25,80,443,43"
#
# Common egress (outbound) UDP ports
EG_UDP_CPORTS="20,21,53"


Save the changes: Ctrl+X then Y


8. Starting the firewall
/usr/local/sbin/apf -s

Other commands:
usage ./apf [OPTION]
-s|--start ......................... load firewall policies
-r|--restart ....................... flush & load firewall
-f|--flush|--stop .................. flush firewall
-l|--list .......................... list chain rules
-st|--status ....................... firewall status
-a HOST CMT|--allow HOST COMMENT ... add host (IP/FQDN) to allow_hosts.rules and
immediately load new rule into firewall
-d HOST CMT|--deny HOST COMMENT .... add host (IP/FQDN) to deny_hosts.rules and
immediately load new rule into firewall


9. After everything is fine, change the DEV option
Stop the firewall from automatically clearing itself every 5 minutes from cron.
We recommend changing this back to "0" after you've had a chance to ensure everything is working well and tested the server out.

pico /etc/apf/conf.apf

FIND: DEVM="1"
CHANGE TO: DEVM="0"

10. Configure AntiDOS for APF
Relatively new to APF is the new AntiDOS feature which can be found in: /etc/apf/ad
The log file will be located at /var/log/apfados_log so you might want to make note of it and watch it!

pico /etc/apf/ad/conf.antidos

There are various things you might want to fiddle with but I'll get the ones that will alert you by email.

# [E-Mail Alerts]
Under this heading we have the following:

# Organization name to display on outgoing alert emails
CONAME="Your Company"
Enter your company information name or server name..

# Send out user defined attack alerts [0=off,1=on]
USR_ALERT="0"
Change this to 1 to get email alerts

# User for alerts to be mailed to
USR="your@email.com"
Enter your email address to receive the alerts

Save your changes! Ctrl+X then press Y
Restart the firewall: /usr/local/sbin/apf -r

11. Checking the APF Log

Will show any changes to allow and deny hosts among other things.
tail -f /var/log/apf_log

Example output:
Aug 23
01:25:55 ocean apf(31448): (insert) deny all to/from 185.14.157.123
Aug 23
01:39:43 ocean apf(32172): (insert) allow all to/from 185.14.157.123


12. New - Make APF Start automatically at boot time
To autostart apf on reboot, run this:

chkconfig --level 2345 apf on

To remove it from autostart, run this:

chkconfig --del apf


13. Denying IPs with APF Firewall (Blocking)

Now that you have your shiny new firewall you probably want to block a host right, of course you do! With this new version APF now supports comments as well. There are a few ways you can block an IP, I'll show you 2 of the easier methods.

A) /etc/apf/apf -d IPHERE COMMENTHERENOSPACES
> The -d flag means DENY the IP address
> IPHERE is the IP address you wish to block
> COMMENTSHERENOSPACES is obvious, add comments to why the IP is being blocked
These rules are loaded right away into the firewall, so they're instantly active.
Example:

./apf -d 185.14.157.123 TESTING

pico /etc/apf/deny_hosts.rules

Shows the following:

# added 185.14.157.123 on
08/23/05 01:25:55
# TESTING
185.14.157.123

B) pico /etc/apf/deny_hosts.rules

You can then just add a new line and enter the IP you wish to block. Before this becomes active though you'll need to reload the APF ruleset.

/etc/apf/apf -r

14. Allowing IPs with APF Firewall (Unblocking)

I know I know, you added an IP now you need it removed right away! You need to manually remove IPs that are blocked from deny_hosts.rules.
A)
pico /etc/apf/deny_hosts.rules

Find where the IP is listed and remove the line that has the IP.
After this is done save the file and reload apf to make the new changes active.

/etc/apf/apf -r

B) If the IP isn't already listed in deny_hosts.rules and you wish to allow it, this method adds the entry to allow_hosts.rules

/etc/apf/apf -a IPHERE COMMENTHERENOSPACES
> The -a flag means ALLOW the IP address
> IPHERE is the IP address you wish to allow
> COMMENTSHERENOSPACES is obvious, add comments to why the IP is being removed These rules are loaded right away into the firewall, so they're instantly active.
Example:

./apf -a 185.14.157.123 UNBLOCKING

pico /etc/apf/allow_hosts.rules

# added 185.14.157.123 on 08/23/05 01:39:43
# UNBLOCKING
185.14.157.123


Thanks to R-fx networks for developing and maintaining APF Firewall. Written by Steven Leggett of WebHostGear.com Need help with APF? Visit the WebHostGear Forums

Continue reading What is APF (Advanced Policy Firewall)?

10 Steps to Securing your Server


So many people are getting their own dedicated servers but are completely clueless about security. Usually they leave it up to the company where they purchase it or hire someone. That's fine but make sure you have these 10 items covered.

1) Use a Firewall
Make absolutely sure that your server has a firewall running all the time. A firewall is like a screen door to your porch. It blocks out flies, rodents and other pests but you can still walk out and use your BBQ. If someone ever were to get into your server, which is very very likely, the first thing they're going to try and do is upload something to start a daemon or their own service like an IRC server or use a port to launch attacks to other systems. A firewall with egress and ingress protection can stop both incoming and outgoing attacks even when you're not aware of it. I recommend using APF on Linux systems or TinyFirewall on Windows Servers. These are software firewalls so there's no extra monthly cost like a hardware firewall. For very busy systems a hardware firewall is recommended so it takes the burden off your system CPU/RAM and resources to do the work.

Know what ports are open and why, know how to block and unblock an IP. These are basic things you need to understand in the daily security of your system. If someone from an IP begins a brute force attack you want to know how to stop them, right away. Installing APF Firewall, Preventing Brute Force Attacks, Installing KISS Firewall

2) Update your kernel and OS
Make sure your server is using current, updated software. Use the stable version which has been tested more than any beta and update as soon as possible. An old kernel can lead to an easy target for your server. If you're not sure then ask your provider for the latest update.

3) Monitor Logs
Do you know what logs record which activities? How often are they updated and rotated?
LogWatch is a great tool to email you the daily reports of your systems activity of anything it determines unusual, EG repeated failed logins. Besides using this you should check your logs manually to see what’s up. Tail –f /var/log/messages and view your Apache logs as well. Apache Log Files Explained

4) Backups
I still never understand why no one backs up their data yet you spend hundreds of hours working on your website or application then you absolutely must have a second hard drive for backups or use a remote back up system or a combination of these. Second Hard Drive Means Life or Death

5) Limit Access to a Minimum
Do not give users more access than the absolute minimum they require. Never give them shell access, restrict file access to a bare minimum and leave other services turned off by default until specifically requested and you determine that its safe to do so.

6) Lock down PHP and use Mod_Security with Apache
PHP is actually a large security risk but there are a few things to do to help lock it down. CGI has Suexec,which helps runs proccesess as the user and PHP has something similar called PHPSuexec but there are a few downfalls. You should also use open_base directory protection, have safe_mode on system wide, turn off register_globals, enable_dl and allow_url_open to help lock things down further.

You can use server wide protection with mod_security, a web server filter that can watch all requests to see if they match a rule and react by logging, denying the request or other programs. I highly recommend this on Apache based servers and can be extremely useful in blocking attacks and stopping hackers before they do any damage. Securing Safe Mode , Installing Mod_Security


7) Lock /tmp /var/tmp and /dev/shm partitions
On Linux each partition can have certain access restrictions. Since /tmp /var/tmp and /dev/shm are world writable directories they’re often home to uploads, sessions storage and hacker executables. Since anyone can read-write-excute anything from these directories it becomes a major security concern. With /etc/fstab however you can limit what can be done in these locations. If you see defaults beside the /tmp line remove it and replace it with noexec,nosuid this will stop any executables from being allowed to run. Do the same for /dev/shm and make /var/tmp and shortcut (symbolic link) to /tmp. Securing Your TMP Partition

8) Intrusion Detection System (IDS)
An intrusion detection system or IDS is like a burglar alarm on your server. It keeps a record of which files were changed when and alerts you of anything new or altered. This is critical because hackers usually try to replace binary applications like ps, top, netstat and others. This means when you run this new version of ps or top to see processes running they make it so it actually HIDES their hacker software, even though its running it won’t show up. Some IDS systems include TripWire, Snort and AIDE. Installing Chkrootkit

9) Review Processes Running and Remove Extra Software
You can’t protect a system if you don’t know what’s on it. If a hacker adds an extra process that you see in PS but you wouldn’t notice if you didn’t know what should be there usually. Know what runs on your system and why which user. How does Perl or Apache run, under which user? You can check your processes usually with top or ps auxfww which gives you a tree view. Check these every time you login to your server. Getting started with Shell (SSH) , Common Shell Commands

10) Keep an Eye on the Servers Performance
Know what speed your server is running at and how much bandwidth it uses on a daily basis. If an attacker compromises your system and you don’t know you’ll probably notice the system responding slowly or using a lot of bandwidth. If you don’t know what your system is usually like how will you notice something out of the ordinary. This is all common sense but some people never bother to check until they ask their provider after a system has been slow for 2 weeks – it’s usually to late then. Server Loads Explained

Knowing your system makes you one step ahead of an intruder. Check it often and ask an expert if you’re ever over your head. There are MANY other things you can and should do to ensure your server is secure but these are a few basics that everyone should use.

If you have anything you’d like to add please comment on this article.

Continue reading 10 Steps to Securing your Server

Secure your Server with iptables


Central to securing a Linux server that's connected to the Internet is having a good firewall and specific policies in place. Numerous options exist for those considering firewalls for Linux, however, a free and included solution is onoffer through Netfilter and iptables.

Stateful Firewall

As of Linux kernel 2.4 and above, Netfilter has been included as a kernel extension by the majority of (if not all) Linux distributors. iptables is its counterpart and the tool for managing firewall rules. The duo, which I call simply "iptables", creates a stateful firewall on a Linux desktop or server. "Stateful" refers to the firewall's ability to track the state of packets moving in and out of a server and/or network.

This is an improvement on the former ipchains, through which packet state was not available. Thus, iptables can distinguish between new and existing connections and keep track of traffic. iptables recognizes four kinds of packet states: new, established, related and invalid.

The developer can take any number of routes and options when deploying an iptables firewall: via prepackaged solutions like APF, from within a control panel such as Webmin, which has an iptables module, or by way of a GUI configuration tool such as Firestarter.

For the purpose of this article, we'll focus on securing a single development Web server environment where multiple services are offered. This will be accomplished via configuring iptables manually in a command line text editor (which is traditionally stored at /etc/sysocnfig/iptables).

This also means we will only be discussing the filter table, which is one of three tables in the firewall system (others include Mangle, which manages quality of services issues with packet traffic, and the NAT (network address translation) table).

How iptables Works

iptables executes its rules based on the TCP protocol handshake. When a remote device connects to your server, a packet is sent with a SYN (short for synchronization) bit, which is generally acknowledged with a SYN/ACK (synchronization acknowledged) sent from your server back to the client. The client then acknowledges receipt of this with an ACK, and the network relationship is established.

This terminology has also become more familiar to non-network administrators in recent years due to some well-publicized cases of SYN flooding, which is used to execute denial-of-service attacks. This occurs when a remote malicious host (or hosts) repeatedly sends SYN packets to multiple ports on a server, which the server acknowledges. However, instead of sending an ACK back to open a legitimate connection, the remote malicious host(s) continues sending SYN packets and the server repeatedly attempts to acknowledge them, ultimately clogging bandwidth and system resources, and either severely hampering or blocking all other traffic.

We will look at an option to protect against SYN flooding later, when we configure our server's firewall.

Getting Started

Only the root user can manage iptables, so the usual precautions -- taking action as root -- can cause damage to your server's health if a user is not careful.

iptables may or may not be running on your system. You can check by issuing '/etc/rc.d/init.d/iptables status', which will either list the status of your firewall rules, or return something along the lines of 'firewall is stopped'.

Controlling iptables operations is simple, with options such as start, stop, status and others using the above command.

At this point, we'll assume that you don't have an iptables configuration, and we'll build the rules file from scratch. First, we need to identify the services you wish to enable (i.e. FTP, SSH, mail and HTTP), identify areas of concern (i.e. like SYN flooding) and potentially note any IP addresses whose access you may seek to ban.

If you are using a Red Hat-flavored system, as I am (Fedora Core 3 on a development server), you may find some generic rules in the /etc/sysconfig/iptables file. You will want to back up an existing iptables file if it has been in use. This can be done on the command line via 'cp /etc/sysconfig/iptables /etc/sysconfig/iptables.backup'.

To start building your rules, open that file in your favorite command line editor. I issue 'vi /etc/sysconfig/iptables'; you will press the Insert key or letter I key to start editing. Remember that when you're finished editing, you'll want to press the ESC key and type ':wq' to save the file in Vi.

Allowing Targeted Access

Let's build a set of firewall rules that will allow ftp, and allow ssh only to the IP addresses you specify and some additional ports you may need for other services. We'll break each section down and discuss the details as we go.

One caveat: this firewall example will not be a completely hardened overview for the truly paranoid production box; it's meant to serve as a primer to help you get used to handling basic rules with a solid level of packet filtering.

With the iptables file open in your favorite text editor, begin by setting some basic parameters. Use the following entry:

#My firewall config in /etc/sysconfig/iptables
#It is good practice to comment, initial, and date your config files for the sake of shared #administrative environments and, also, so you remember what has been done in a file.
*filter
:OUTPUT ACCEPT [0:0]
:FORWARD ACCEPT [0:0]
:FWALL-INPUT - [0:0]
:INPUT ACCEPT [0:0]
-A INPUT -j FWALL-INPUT

This allows outgoing access from your server, and allows forwarding as well as accepting all incoming traffic (if passing packets through your server is not needed, simply change the FORWARD from ACCEPT to DROP). However, this code forwards all incoming traffic to our firewall rules (FWALL-INPUT) for filtering.

As SSH is a critical factor for system management, user access and other options such as requiring SFTP from your clients, let's enable this service. Depending on how you manage your clients/users, you may simply allow all incoming SSH traffic:

#accept all incoming ssh traffic
-A FWALL-INPUT -p tcp -m tcp -s 0/0 --dport 22 -j ACCEPT

Alternatively, SSH can be restricted to identified static IP address hosts:

#accept incoming ssh traffic from user John Doe
-A FWALL-INPUT -p tcp -m tcp -s x.x.x.x --dport 22 -j ACCEPT
#end specific ssh access – this commenting is handy of you have multiple users here as #you can start and end sections if users have multiple IPs from which they can access

In breaking down those lines of code, we see:

  • -A appends the rule to the firewall rule set
  • -p represents protocol (which can be tcp, udp and icmp in varying cases)
  • -m is for match and opens up options for extending packet management, for example to have granular control over SYN bits, defining destination and source ports. This is better explained at length in 'man iptables' than here, as multiple levels of options are available.
  • -s signifies the source address, where 0/0 stands for any host, a specific host IP address can be used (as in the example above), or a network segment can be denoted, such as 10.0.1.0/24.
  • --dport points to the destination port; in the case of SSH, it's 22.
  • -j selects the target (or jump target), which may be a custom target, or one of the common built-in targets such as ACCEPT or DROP.

Next, let's consider FTP, an entry for the Webmin control panel, and a host of commonly used ports that are important to your server's operation on the Internet.

# manage ftp port traffic
-A FWALL-INPUT-p tcp -m tcp --dport 21 -j ACCEPT
# end ftp port

#My webmin custom port
-A FWALL-INPUT-p tcp -m tcp --dport 42009 -j ACCEPT
# end webmin

#SNMP monitoring so I can use a remote monitoring tool
-A FWALL-INPUT-p udp -m udp --dport 161 -j ACCEPT
-A FWALL-INPUT-p udp -m udp --sport 1023:2999 -j ACCEPT
#end SNMP

A quick security note: when enabling remote access to SNMP, please be sure to have invested time in securing your SNMP configuration file(s), including changing community strings and using authentication.

# some standard out ports with port definition
#POP mail
-A FWALL-INPUT-p tcp -m tcp --dport 110 -j ACCEPT --syn
#HTTPS
-A FWALL-INPUT-p tcp -m tcp --dport 443 -j ACCEPT --syn
#SMTP Traffic
-A FWALL-INPUT-p tcp -m tcp --dport 25 -j ACCEPT --syn
#HTTP
-A FWALL-INPUT-p tcp -m tcp --dport 80 -j ACCEPT --syn
#In my case - Urchin
-A FWALL-INPUT-p tcp -m tcp --dport 9999 -j ACCEPT --syn
#MySQL database server
-A FWALL-INPUT-p tcp -m tcp --dport 3306 -j ACCEPT --syn
-A FWALL-INPUT-p udp -m udp --dport 3306 -j ACCEPT
#IMAP mail services
-A FWALL-INPUT-p tcp -m tcp --dport 143 -j ACCEPT --syn
#DNS
-A FWALL-INPUT-p tcp -m tcp --dport 53 -j ACCEPT --syn
-A FWALL-INPUT-p udp -m udp --dport 53 -j ACCEPT
-A FWALL-INPUT-p udp -m udp -s 0/0 -d 0/0 --sport 53 -j ACCEPT
#Localhost traffic
-A FWALL-INPUT-i lo -j ACCEPT
#The below commits the rules to production for iptables to execute
COMMIT

You will notice we added the --syn flag. This is part of the previously mentioned -m (for matching) option in iptables. Here, we are specifically ensuring that only new connections with a SYN bit, and for which no ACK is set, are accepted.

At this point, you have a working development firewall. You can add and remove services to meet your own requirements. However, we can make some additional entries. We can add a final rule that drops all packets that do not qualify for any of our preceding ports.

#Drop all other new requests not meeting any existing rule requirements applied to traffic
-A FWALL-INPUT -p tcp -m tcp -j REJECT --syn
-A FWALL-INPUT -p udp -m udp -j REJECT

SYN Flood Protection

For some added protection, we can also seek to prevent the flooding of new requests (packets with the SYN bit set and no ACK, as discussed earlier in the article) by limiting the amount of requests to 5 seconds, which allows the system time to apply the rules.

-A FWALL-INPUT –p tcp --syn -m limit --limit 5/second -j ACCEPT

This should appear at the top of your rules, just above the first SSH entry.

Banning Access

If there are troublesome hosts you have discovered in your logs, these can be banned via iptables; however, be cautious in light of IP masquerading. Do some research on the IP address you wish to block, to ensure it is not a legitimate SMTP server, or worse: one of your clients who has been spoofed.

To block a specific host:

#Block malicious system
-A FWALL-INPUT -p tcp -m tcp -s x.x.x.x -j DROP

Checking Firewall Logs

iptables traditionally logs basic entries to /var/log/messages. However, specific logging needs to be noted in your firewall rules if you'd like to track and research traffic. Many prefer to log only drop/reject actions, as this allows them to see any potential malicious behavior that's being attempted.

This can be handled with an entry like the following:

#Option 1 logging drop/reject actions
-A FWALL-INPUT -j LOG --log-level alert
#Option 2 logging with a prefix for easy search/grep of log file
-A FWALL-INPUT -j LOG --log-prefix "Dropped: "

Finally, a nice open source iptables log analyzer is available; it provides an interface similar to those commonly used to view Web traffic statistics. Found online at gege.org, this daemon can be implemented into a LAMP (specifically PHP and MySQL) environment and used to log all iptables actions in place of the default /var/log/messages.

Setup and configuration is straightforward and only a minor edit to your iptables file will start the reporting process.

Next Steps

The man pages for iptables are extensive and it is recommended to spend some time getting accustomed to the various options before moving a firewall into production. For example, options exist for using the -m (matching) option to manage packet states - i.e. allowing only new and established connections for specific services.

There are endless documents related to iptables on the Web, however, the best place to start is at the source: Netfilter's Website. Tutorials range from basic networking concepts and packet filtering to setting up network address translation and advanced connection tracking options.

Finally, as noted before, this firewall does not represent the be-all and end-all configuration. It is a great place to start when exploring your options with iptables. Administrators, based on their environment, will have varying levels of paranoia to accommodate. Some systems I manage are locked as tight as possible, while others have fairly open doors for testing and development.

Continue reading Secure your Server with iptables

20 ways to Secure your Apache Configuration

Here are 20 things you can do to make your apache configuration more secure।

Disclaimer: The thing about security is that there are no guarantees or absolutes. These suggestions should make your server a bit tighter, but don't think your server is necessarily secure after following these suggestions.

Additionally some of these suggestions may decrease performance, or cause problems due to your environment. It is up to you to determine if any of the changes I suggest are not compatible with your requirements. In other words proceed at your own risk.

First, make sure you've installed latest security patches

There is no sense in putting locks on the windows, if your door is wide open. As such, if you're not patched up there isn't really much point in continuing any longer on this list. Go ahead and bookmark this page so you can come back later, and patch your server.

Hide the Apache Version number, and other sensitive information.

By default many Apache installations tell the world what version of Apache you're running, what operating system/version you're running, and even what Apache Modules are installed on the server. Attackers can use this information to their advantage when performing an attack. It also sends the message that you have left most defaults alone.

There are two directives that you need to add, or edit in your httpd.conf file:

ServerSignature Off
ServerTokens Prod

The ServerSignature appears on the bottom of pages generated by apache such as 404 pages, directory listings, etc.

The ServerTokens directive is used to determine what Apache will put in the Server HTTP response header. By setting it to Prod it sets the HTTP response header as follows:

Server: Apache

If you're super paranoid you could change this to something other than "Apache" by editing the source code, or by using mod_security (see below).

Make sure apache is running under its own user account and group

Several apache installations have it run as the user nobody. So suppose both Apache, and your mail server were running as nobody an attack through Apache may allow the mail server to also be compromised, and vise versa.

User apache
Group apache

Ensure that files outside the web root are not served

We don't want apache to be able to access any files out side of its web root. So assuming all your web sites are placed under one directory (we will call this /web), you would set it up as follows:

  Order Deny,Allow
  Deny from all
  Options None
  AllowOverride None
  Order Allow,Deny
  Allow from all

Note that because we set Options None and AllowOverride None this will turn off all options and overrides for the server. You now have to add them explicitly for each directory that requires an Option or Override.

Turn off directory browsing

You can do this with an Options directive inside a Directory tag. Set Options to either None or -Indexes

Options -Indexes

Turn off server side includes

This is also done with the Options directive inside a Directory tag. Set Options to either None or -Includes

Options -Includes

Turn off CGI execution

If you're not using CGI turn it off with the Options directive inside a Directory tag. Set Options to either None or -ExecCGI

Options -ExecCGI

Don't allow apache to follow symbolic links

This can again can be done using the Options directive inside a Directory tag. Set Options to either None or -FollowSymLinks

Options -FollowSymLinks

Turning off multiple Options

If you want to turn off all Options simply use:

Options None

If you only want to turn off some separate each option with a space in your Options directive:

Options -ExecCGI -FollowSymLinks -Indexes

Turn off support for .htaccess files

This is done in a Directory tag but with the AllowOverride directive. Set it to None.

AllowOverride None

If you require Overrides ensure that they cannot be downloaded, and/or change the name to something other than .htaccess. For example we could change it to .httpdoverride, and block all files that start with .ht from being downloaded as follows:

AccessFileName .httpdoverride
    Order allow,deny
    Deny from all
    Satisfy All

Run mod_security

mod_security is a super handy Apache module written by Ivan Ristic, the author of Apache Security from O'Reilly press.

You can do the following with mod_security:

  • Simple filtering
  • Regular Expression based filtering
  • URL Encoding Validation
  • Unicode Encoding Validation
  • Auditing
  • Null byte attack prevention
  • Upload memory limits
  • Server identity masking
  • Built in Chroot support
  • And more

Disable any unnecessary modules

Apache typically comes with several modules installed. Go through the apache module documentation and learn what each module you have enabled actually does. Many times you will find that you don't need to have the said module enabled.

Look for lines in your httpd.conf that contain LoadModule. To disable the module you can typically just add a # at the beginning of the line. To search for modules run:

grep LoadModule httpd.conf

Here are some modules that are typically enabled but often not needed: mod_imap, mod_include, mod_info, mod_userdir, mod_status, mod_cgi, mod_autoindex.

Make sure only root has read access to apache's config and binaries

This can be done assuming your apache installation is located at /usr/local/apache as follows:

chown -R root:root /usr/local/apache
chmod -R o-rwx /usr/local/apache

Lower the Timeout value

By default the Timeout directive is set to 300 seconds. You can decrease help mitigate the potential effects of a denial of service attack.

Timeout 45

Limiting large requests

Apache has several directives that allow you to limit the size of a request, this can also be useful for mitigating the effects of a denial of service attack.

A good place to start is the LimitRequestBody directive. This directive is set to unlimited by default. If you are allowing file uploads of no larger than 1MB, you could set this setting to something like:

LimitRequestBody 1048576

If you're not allowing file uploads you can set it even smaller.

Some other directives to look at are LimitRequestFields, LimitRequestFieldSize and LimitRequestLine. These directives are set to a reasonable defaults for most servers, but you may want to tweak them to best fit your needs. See the documentation for more info.

Limiting the size of an XML Body

If you're running mod_dav (typically used with subversion) then you may want to limit the max size of an XML request body. The LimitXMLRequestBody directive is only available on Apache 2, and its default value is 1 million bytes (approx 1mb). Many tutorials will have you set this value to 0 which means files of any size may be uploaded, which may be necessary if you're using WebDAV to upload large files, but if you're simply using it for source control, you can probably get away with setting an upper bound, such as 10mb:

LimitXMLRequestBody 10485760

Limiting Concurrency

Apache has several configuration settings that can be used to adjust handling of concurrent requests. The MaxClients is the maximum number of child processes that will be created to serve requests. This may be set too high if your server doesn't have enough memory to handle a large number of concurrent requests.

Other directives such as MaxSpareServers, MaxRequestsPerChild, and on Apache2 ThreadsPerChild, ServerLimit, and MaxSpareThreads are important to adjust to match your operating system, and hardware.

Restricting Access by IP

If you have a resource that should only by accessed by a certain network, or IP address you can enforce this in your apache configuration. For instance if you want to restrict access to your intranet to allow only the 176.16 network:

 
Order Deny,Allow
Deny from all
Allow from 176.16.0.0/16
 

Or by IP:

Order Deny,Allow
Deny from all
Allow from 127.0.0.1

Adjusting KeepAlive settings

According to the Apache documentation using HTTP Keep Alive's can improve client performance by as much as 50%, so be careful before changing these settings, you will be trading performance for a slight denial of service mitigation.

KeepAlive's are turned on by default and you should leave them on, but you may consider changing the MaxKeepAliveRequests which defaults to 100, and the KeepAliveTimeout which defaults to 15. Analyze your log files to determine the appropriate values.

Run Apache in a Chroot environment

chroot allows you to run a program in its own isolated jail. This prevents a break in on one service from being able to effect anything else on the server.

It can be fairly tricky to set this up using chroot due to library dependencies. I mentioned above that the mod_security module has built in chroot support. It makes the process as simple as adding a mod_security directive to your configuration:

SecChrootDir /chroot/apache

There are however some caveats however, so check out the docs for more info.

Acknowledgments

I have found the book Apache Security to be a highly valuable resource for securing an apache web server. Some of the suggestions listed above were inspired by this book.

Suggestions

Please post any suggestions, caveats, or corrections in the comments and I will update the post if necessary.

Continue reading 20 ways to Secure your Apache Configuration

Installing Oracle Database 11g on Linux

To install the Oracle software, you must use the Oracle Universal installer.


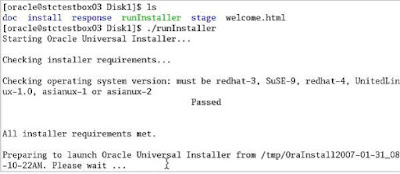
Step- 1. For this installation, you need either the DVDs or a downloaded version of the DVDs. In this tutorial, you install from the downloaded version. From the directory where the DVD files were unzipped, open a terminal window and enter the following:

./runInstaller.sh


Step- 2. The product you want to install is Oracle Database 11g. Make sure the product is selected and click Next.


Step- 3. You will perform a basic installation with a starter database. Enter orcl for the Global Database Name and oracle for Database Password and Confirm Password. Then, click Next.


Step- 4. You need to specify your Inventory directory. The location should be set to /u01/app/oracle/oraInventory. Accept the default Operating System group name, oinstall. Then, click Next.


Step- 5. The installer now verifies that the system meets all the minimum requirements for installing and configuring the chosen product. Please correct any reported errors before continuing. When the check successfully completes, click Next.


Step- 6. Oracle Configuration Manager allows you to associate your configuration information with your Metalink account. You can choose to enable it on this window. Then, click Next.


Step- 7. Review the Summary window to verify what is to be installed. Then, click Install.


Step- 8. The progress window appears.


Step- 9. The Configuration Assistants window appears.


Step- 10. Your database is now being created.


Step- 11. When the database has been created, you can unlock the users you want to use.

Click OK.


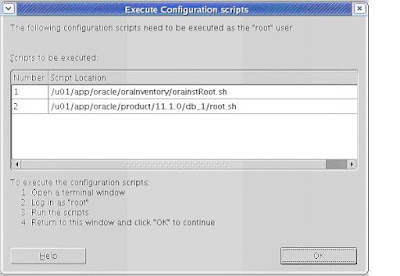
Step- 12. You need to execute orainstRoot.sh and root.sh as the root user.


Step- 13. Open a terminal window and enter the following commands. Follow the prompts as instructed.

su -

cd /u01/app/oracle/oraInventory

./orainstRoot.sh

cd ../product/11.1.0/db_1

./root.sh

exit

exit


Step- 14. Switch back to the Universal Installer and click OK.


Step- 15. Click Exit. Click Yes to confirm exit.


Testing Your Installation

To test that your installation completed successfully, perform the following steps:

1.

Open a browser and enter the following URL:

https://(hostname):1158/em

where <hostname> should be changed to your machine name, IP address, or localhost.

Because Enterprise Manager Database Control is a secure site, you need a certificate. Select the Accept this certificate permanently option, and then click OK.


2.

Enter system as the User Name and oracle as the Password, and then click Login.


3.

The Database Control Home Page appears. Your installation was successful.


Continue reading Installing Oracle Database 11g on Linux

Secure your Linux server using password policy


I think its most important to secure our linux servers.There are many steps to secure our servers. Password security is one of them. I discus here 3 steps of secure our servers by using password. The steps are :

1) Enabling Password Aging
2) Enforcing Stronger Passwords
3) Restricting Use of Previous Passwords


Enabling Password Aging

In general I do not recommend that the system enforces password expiration for system and shared accounts. This could lead to outages if an application's account expires:
# su oracle -c id
You are required to change your password immediately (password aged)
Changing password for test
(current) UNIX password:
Rather a corporate policy should govern password changes for system and shared accounts. But for individual user accounts the system should expire the passwords automatically. The following example shows how password expiration can be setup for individual user accounts.

The following files and parameters in the table are used when a new account is created with the useradd command. These settings are recorded for each user account in the /etc/shadow file. Therefore, make sure to configure the following parameters before you create any user accounts using the useradd command:

/etc/login.defs PASS_MAX_DAYS 60 Maximum number of days a password is valid.
/etc/login.defs PASS_MIN_DAYS 7 Minimum number of days before a user can change the password since the last change.
/etc/login.defs PASS_MIN_LEN n/a This parameter does not work. It is superseded by the PAM module "pam_cracklib". See Enforcing Stronger Passwords for more information.
/etc/login.defs PASS_WARN_AGE 7 Number of days when the password change reminder starts.
/etc/default/useradd INACTIVE 14 Number of days after password expiration that account is disabled.
/etc/default/useradd EXPIRE
Account expiration date in the format YYYY-MM-DD.

Ensure that the above parameters are changed in the /etc/login.defs and /etc/default/useradd files.

When a user account is created using the useradd command, the parameters listed in the above table are recorded in the /etc/shadow file in the following fields:
:::PASS_MIN_DAYS:PASS_MAX_DAYS:PASS_WARN_AGE:INACTIVE:EXPIRE:

To create a new user account you can execute the following command:
useradd -c "Test User" -g users test
The -g option specifies the primary group for this account:
# id test
uid=509(test) gid=100(users) groups=100(users)

The settings in /etc/login.defs and /etc/default/useradd are recorded for the test user in the /etc/shadow file as follows:
# grep test /etc/shadow
test:!!:12742:7:60:7:14::

You can change the password aging any time using the chage command.

To disable password aging for system and shared accounts, you can run the following chage command:
# chage -M 99999 

To get password expiration information:
# chage -l 
For example:
# chage -l test
Minimum: 7
Maximum: 60
Warning: 7
Inactive: 14
Last Change: Jan 11, 2005
Password Expires: Mar 12, 2005
Password Inactive: Mar 26, 2005
Account Expires: Never


Enforcing Stronger Passwords

Practical Considerations

On an audited system it is important to restrict people from using simple passwords that can be cracked too easily. However, if the passwords being enforced are too strong, people will write them down. Strong passwords that are written down are not much safer than weak passwords. Some will argue that strong passwords protect you against e.g. Dictionary Attacks and you can defeat it by locking the accounts after a few failed attempts. However, this is not always an option. As I will show at Locking User Accounts After Too Many Login Failures, locked system accounts could bring down your applications and systems which would be nothing short of a denial of service attack.

Undoubtedly, it is important to practise safe password management. In my opinion, a password should have at least one digit number, one other character, and one upper case letter. But keep in mind not to make it overly complicated.

How to Enforce Stronger Passwords

The pam_cracklib module checks the password against dictionary words and other constraints. Unfortunately, however, the original Linux PAM module pam_cracklib uses a credit mechanism. E.g. if you define password length minlen=10, then you will get 1 credit for e.g. using a single digit number in your password if you defined dredit=1. This means that pam_cracklib will accept a password of the length of minlen-credit. If you don't use a digit number, then the minimum length of the password would be minlen. There was no way to tell the module that a password _must_ include a digit number.

Back in 2000 I wrote a patch for the pam_cracklib module where you can assign negative values to the pam_cracklib parameters lcredit, ucredit, dcredit, and ocredit. Using negative values will disable the credit mechanism. For example, if you define dredit=-1, then the module will only accept a password if it includes at least one digit number and if the password has a length of at least minlen.

Red Hat has finally applied my pam_cracklib patch and you don't have to patch the pam_cracklib module any more. The new pam_cracklib feature works in Red Hat Enterprise Linux 4 and Red Hat Fedora Core 3. This feature is now also included with the Red Hat Enterprise Linux 3 Update 4 and Red Hat Enterprise Linux 2.1 Update 6 release. If the Linux distribution you are using does not use the patched pam_cracklib module yet, you can find the procedure for patching pam_cracklib here.

In the following example I'll assume that you are using the new pam_cracklib module, or that you patched the module if your Linux distribution doesn't include the patched version yet.

The following example shows how to enforce the following password rules:
- Minimum length of password must be 8
- Minimum number of lower case letters must be 1
- Minimum number of upper case letters must be 1
- Minimum number of digits must be 1
- Minimum number of other characters must be 1

pam_cracklib.so
minlen=8
Minimum length of password is 8
pam_cracklib.so
lcredit=-1
Minimum number of lower case letters is 1
pam_cracklib.so
ucredit=-1
Minimum number of upper case letters is 1
pam_cracklib.so
dcredit=-1
Minimum number of digits is 1
pam_cracklib.so
ocredit=-1
Minimum number of other characters is 1


To setup these password restrictions, edit the /etc/pam.d/system-auth file and add/change the following pam_cracklib arguments highlighted in blue:
auth        required      /lib/security/$ISA/pam_env.so
auth sufficient /lib/security/$ISA/pam_unix.so likeauth nullok
auth required /lib/security/$ISA/pam_deny.so
account required /lib/security/$ISA/pam_unix.so
account sufficient /lib/security/$ISA/pam_succeed_if.so uid < 100 quiet
account required /lib/security/$ISA/pam_permit.so
password requisite /lib/security/$ISA/pam_cracklib.so retry=3 minlen=8 lcredit=-1 ucredit=-1 dcredit=-1 ocredit=-1
password sufficient /lib/security/$ISA/pam_unix.so nullok use_authtok md5 shadow
password required /lib/security/$ISA/pam_deny.so
session required /lib/security/$ISA/pam_limits.so
session required /lib/security/$ISA/pam_unix.so

Now verify that the new password restrictions work for new passwords. Simply login to a non-root account and change the password using the passwd command. Note that the above requirements are not enforced if you run the passwd command under root.

NOTE: The /etc/pam.d/system-auth PAM configuration file is auto-generated and contains records which dictate a generic authentication scheme. Keep in mind that authconfig might clobber some changes you made. Since I never run authconfig I usually make changes to this file because it's used by many PAM aware applications. Otherwise I'd have to make changes to many configuration files. Changing system-auth is usually the preferred method. You might even want to disable all execution bits from the /usr/bin/authconfig binary to prevent authconfig from clobbering your changes.

Restricting Use of Previous Passwords

The pam_unix module parameter remember can be used to configure the number of previous passwords that cannot be reused. And the pam_cracklib module parameter difok can be used to specify the number of characters hat must be different between the old and the new password.

In the following example I will show how to tell the system that a password cannot be reused for at least 6 months and that at least 3 characters must be different between the old and new password.

Remember that in the chapter Enabling Password Aging we set PASS_MIN_DAYS to 7, which specifies the minimum number of days allowed between password changes. Hence, if we tell pam_unix to remember 26 passwords, then the previously used passwords cannot be reused for at least 6 months (26*7 days).

Here is an example. Edit the /etc/pam.d/system-auth file and add/change the following pam_cracklib and pam_unix arguments:
auth        required      /lib/security/$ISA/pam_env.so
auth sufficient /lib/security/$ISA/pam_unix.so likeauth nullok
auth required /lib/security/$ISA/pam_deny.so
account required /lib/security/$ISA/pam_unix.so
account sufficient /lib/security/$ISA/pam_succeed_if.so uid < 100 quiet
account required /lib/security/$ISA/pam_permit.so
password requisite /lib/security/$ISA/pam_cracklib.so retry=3 minlen=8 lcredit=-1 ucredit=-1 dcredit=-1 ocredit=-1 difok=3
password sufficient /lib/security/$ISA/pam_unix.so nullok use_authtok md5 shadow remember=26
password required /lib/security/$ISA/pam_deny.so
session required /lib/security/$ISA/pam_limits.so
session required /lib/security/$ISA/pam_unix.so

NOTE:
If the /etc/security/opasswd doesn't exist, create the file.
# ls -l /etc/security/opasswd
-rw------- 1 root root 0 Dec 8 06:54 /etc/security/opasswd
Continue reading Secure your Linux server using password policy