Introduction
DKIM is an authentication framework which stores public-keys in DNS and digitally signs emails on a domain basis. It was created as a result of merging Yahoo's domainkeys and Cisco's Identified Internet mail specification. It is defined in RFC 4871.We will be using the OpenDKIM implementation Centos, OpenDKIM is a fork of dkim-milter.
Installation
yum install opendkim
Generate the Keys
Replace with the domain name you will be signing the mail for, and with a selector name it can be anything (but just one word). The command will create two files.opendkim-genkey -d-s
-
.txt - contains the public key you publish via DNS
-
.private - the private key you use for signing your email
# mv.private /etc/opendkim/keys/ / .pem # chmod 600 /etc/opendkim/keys/ / .pem # chown opendkim.opendkim /etc/opendkim/keys/ / .pem
DNS Setup
You need to publish your public key via DNS, client servers use this key to verify your signed email. The contents of .txt is the record you need to add to your zone file a sample, is below (it uses default as the selector and example.com as the domain_name)default._domainkey IN TXT "v=DKIM1; r=postmaster; g=*; k=rsa; p=MIGfMA0GCSqGSIb3DQEBAQUAA4GNA DCBiQKBgQDG81CNNVOlWwfhENOZEnJKNlikTB3Dnb5kUC8/zvht/S8SQnx+YgZ/KG7KOus0By8cIDDv wn3ElVRVQ6Jhz/HcvPU5DXCAC5owLBf/gX5tvAnjF1vSL8ZBetxquVHyJQpMFH3VW37m/mxPTGmDL+z JVW+CKpUcI8BJD03iW2l1CwIDAQAB" ; ----- DKIM default for example.com
Configuration
Edit /etc/opendkim.conf comment out "KeyFile /etc/opendkim/keys/default.private" and uncomment "#KeyTable /etc/opendkim/KeyTable"Edit the file /etc/opendkim/KeyTable and add your domain using the following format
Add your servers IP addresses to /etc/opendkim/TrustedHosts._domainkey. : :/etc/opendkim/keys/ / .pem
More advanced configuration options can be set in the file /etc/opendkim.conf
Configure Postfix
You need to add the following options to the postfix main.cf file to enable it to use the milter.Append the OpenDKIM options to the existing milters if you have other milters already configured.smtpd_milters = inet:localhost:8891 non_smtpd_milters = inet:localhost:8891
Start OpenDKIM and restart postfix
# service opendkim start
# service postfix restart
Testing
Send an email to sa-test@sendmail.net or autorespond+dkim@dk.elandsys.com, you will receive a response stating if your setup is working correctly. If you have a Gmail account you can send an email to that account and look at the message details similar to the picture below, you should see signed-by “your domain” if your setup was done correctly.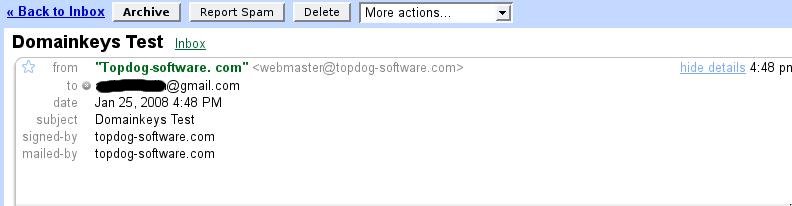
0 $type={blogger}:
Post a Comment